Barcode Labels (Library Manager)
Destiny lets you print copy barcode labels individually or for a group of used or unused labels.
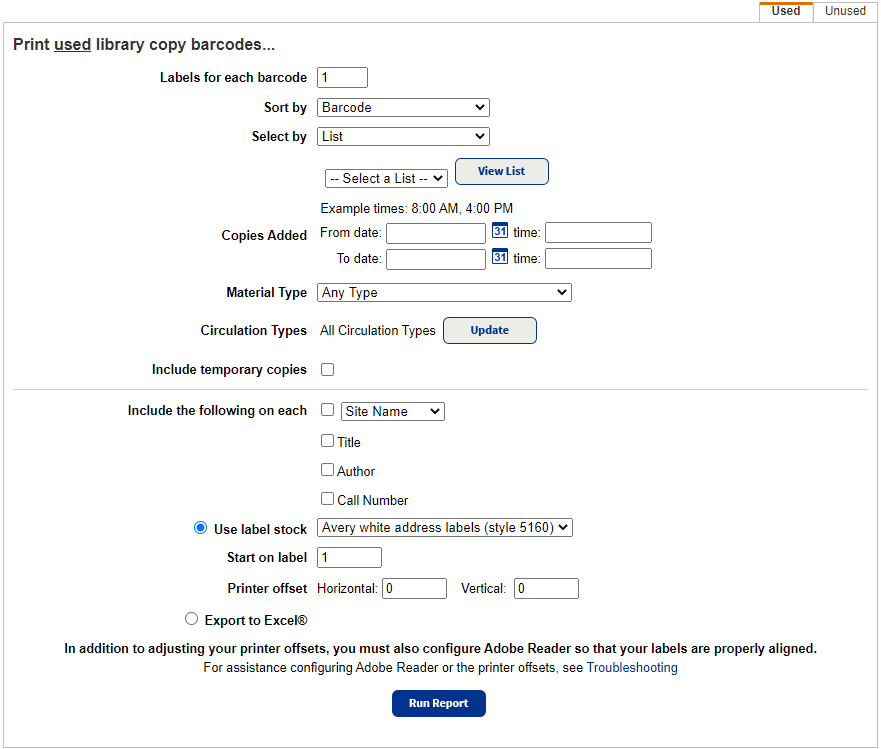
Print Used Library Copy Barcodes
- Select Reports > Library Reports.
- Under Labels, click Barcode Labels.
- Select the Used sub-tab.
- If you are running the report at the district, select either the district or a single site from the At drop-down.
- To print multiple labels for each barcode, type the number in the Labels for each barcode field.
- Use the Sort by drop-down to select how you want to sort the labels.
Note: You can also choose to Group by Site at the district. - From the Select by drop-down, choose how you will create the report:
- List or Copy Category: Select the appropriate list.
- Barcode List: Scan your barcodes directly into Destiny to create a new list or choose a previously created list.
- Barcode Range: Enter the starting and ending barcode numbers in the fields. Only labels for barcode numbers that are in use are printed; it skips any that are unused.
- Leave both boxes blank to include all the barcode numbers in use in the defined barcode symbology.
- Leave the first box blank and enter a number in the second box, the printing includes labels for all used barcode numbers up to and including the number in the second box.
- Enter a number in the first box and leave the second box blank, the printing includes labels for that number and all those after it.
- Date / Time Copies Added: Enter beginning and ending dates to have all copies added during that timeframe. Adding the time is optional.
- Use the Material Type drop-down to select a specific material type.
- To select specific Circulation Types to include, click Update and then click OK.
- To create barcodes for temporary copies, click the Include temporary copies checkbox.
- Use the Include the following on each checkboxes to mark what information you want on the labels.
- Use the Label Stock drop-down to select your label stock or to manipulate the generated report data, choose Export to Excel®.
- If you choose labels, use the drop-down to choose one of the preloaded label stocks:
- Enter the number of the next available label in the Start on label field.
Notes:
- With Destiny, you can continue using previously-used label sheets so you do not waste any of your labels. To determine the Start on label, see Label Numbering.
- Offsets needed for each label stock vary from printer to printer, and some printers don't allow offsets. Any offsets you define for labels are in addition to the unprintable area defined in your printer's properties.
- If your page needs to be moved left or right (horizontal) or up or down (vertical), enter the appropriate setting in Printer offset
- Horizontal: Use the Horizontal printer offset to move the printing left or right. Each number is equal to 1/10th of a millimeter. To see a difference, change the existing number by at least 10. A smaller number shifts the printing to the left. A larger number shifts the printing to the right. Make sure the number you enter is within the allowable range for your stock.
- Vertical: Use the Vertical printer offset to move the printing up or down. Each number is equal to 1/10th of a millimeter. To see a difference, change the existing number by at least 10. A smaller number shifts the printing upwards. A larger number shifts the printing down. Make sure the number you enter is within the allowable range for your stock.
- Enter the number of the next available label in the Start on label field.
- Click Run Report.
- Report Manager opens. When the status changes to Completed, click View.
- Using your Adobe Reader print options, select the printer of choice, place label stock in the printer, and deselect the Fit to page checkbox.
Print Unused Library Copy Barcodes
- Select Reports > Library Reports.
- Under Labels, click Barcode Labels.
- Select the Unused sub-tab.

- To print multiple labels for each barcode, type the number in the Labels for each barcode field.
- In the Number of Barcodes field, enter the quantity of labels needed.
- In the Starting Barcode field, enter the starting barcode number.
Notes:
You can enter your highest barcode, or, if you would like to fill gaps in your number sequence, enter a lower number. Destiny prints only barcode numbers that are not in use; it skips any used barcode numbers.
To identify (and copy, if desired) the next available barcode number, click the symbology name next to Starting Barcode field.
If the barcode number you enter is more than 7 characters, its symbology must match the symbology that appears in brackets. If it does not, you will need to change the symbology in Admin > Site Configuration before generating the labels.
- Choose to output the report as Export to Excel® or Use label stock.
- If you choose labels, use the drop-down to choose one of the preloaded label stocks:
- Enter the number of the next available label in the Start on label field.
Notes:
- With Destiny, you can continue using previously-used label sheets so you do not waste any of your labels. To determine the Start on label, see Label Numbering.
- Offsets needed for each label stock vary from printer to printer, and some printers don't allow offsets. Any offsets you define for labels are in addition to the unprintable area defined in your printer's properties.
- If your page needs to be moved left or right (horizontal) or up or down (vertical), enter the appropriate setting in Printer offset
- Horizontal: Use the Horizontal printer offset to move the printing left or right. Each number is equal to 1/10th of a millimeter. To see a difference, change the existing number by at least 10. A smaller number shifts the printing to the left. A larger number shifts the printing to the right. Make sure the number you enter is within the allowable range for your stock.
- Vertical: Use the Vertical printer offset to move the printing up or down. Each number is equal to 1/10th of a millimeter. To see a difference, change the existing number by at least 10. A smaller number shifts the printing upwards. A larger number shifts the printing down. Make sure the number you enter is within the allowable range for your stock.
- Enter the number of the next available label in the Start on label field.
- Click Run Report.
- Report Manager opens. When the status changes to Completed, click View.
- Using your Adobe Reader print options, select the printer of choice, place label stock in the printer, and deselect the Fit to page checkbox.