Collection Statistics - Historical Report
Use the Collection Statistics - Historical report to:
- Review circulation statistics for a particular period.
- Organize the report by call number prefix, Dewey number, or copy category.
- Limit to show only copies with a certain number of circulations.
- Get information on particular titles in a Resource List.
- Save the report, and run it repeatedly.
- Produce either
.pdfor.xls.
Circulation statistics can be gathered by date range and can show a summary or title and copy details.
To generate the report:
- Log in to the district or a site.
- Select Reports > Library Reports.
- Under Statistics, click Collection Statistics - Historical.
- Use the Circulations fields to enter a date range.
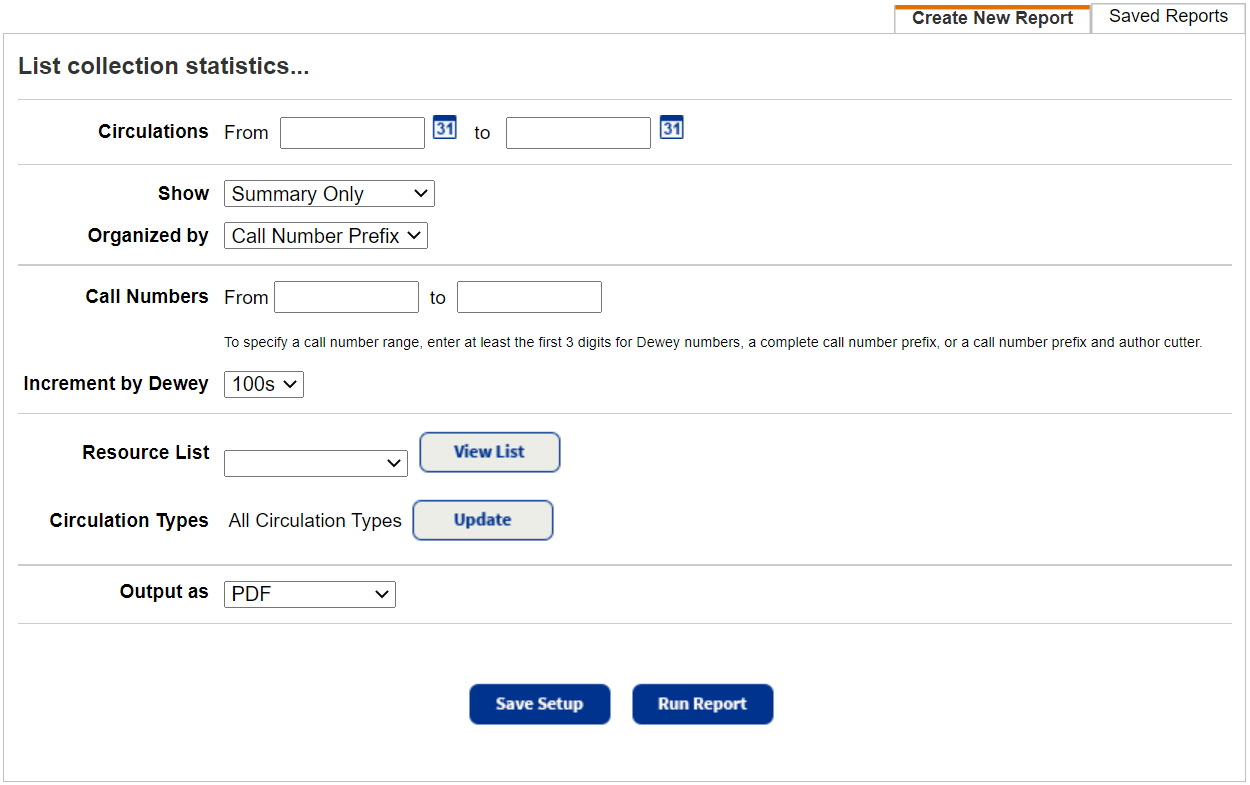
Note: You can limit to one date or a range.
Leave both fields blank – the report includes all circulation dates.
Leave the first field blank, and enter a date in the to field – the report includes all those up to and including the date entered.
Enter a date in the first field, and leave the to field blank – the report includes that date and all those after it.
Enter the same date in both fields – the report is limited to that one date.
- If you are running the report at the district, use the For drop-down to choose a specific site.
- If you are running the report at a site, use the Show drop-down to choose what information to include in the report.
- Use the Organized by drop-down to organize the report by Call Number Prefix or Dewey.
Note: If running the report at a site, Copy Category is also an option. The remaining fields on the page are limited to Limit Copies and instead of choosing Circulation Types, you can choose the Copy Categories to use for the report. - Enter a Call Number range to include in the report:
- Leave both fields blank to include all call numbers.
- Leave the From field blank, and enter a number in the to field. The report includes all those up to and including the number in the to field.
- Enter a number in the From field, and leave the to field blank. The report includes that number and all those after it.
- Enter the same number in both fields. The report is limited to that one call number.
- If running the report at the district, you can select the Use the call number prefix map checkbox to use and group the report by the mapped call number prefixes.
- Use the Increment by Dewey drop-down to select how to incrementally group the report.
Note: This is only available if you selected Summary Only from the Show drop-down. - Select the Limit Copies checkbox to show copies that have more, less, or a specific number of circulations. Choose the option from the drop-down, and then type a number into the field.
Note: This is only available if you selected Title & Copy Details from the Show drop-down. - Use the Resource List drop-down to run the report based on a specific list.
- To run the report for specific Circulation Types, click Update to select those to use.
- Select a report format from the Output as drop-down:
- To generate the report in Adobe® PDF format, select PDF.
- To generate the report in Microsoft® Excel format, select Microsoft Excel.
- To generate the report now, click Run Report.
- To save the setup, click
Save Setup and enter a name that is unique for your library. Do one of the following:
- Click Save to save the report.
- Click Save & Run to save the report and generate it now.
- Click Save to save the report.
Saved Reports
Once you save the report setup, it appears on the Saved Reports sub-tab, where you have more options for working with it:
- Add to Favorites: Click the Add to Favorites icon,
 , to add the report to your My Favorites page. Reports already in your My Favorites list are designated with a favorite icon,
  .
. - Run: Click Run to run the report. Each time you run the report, the results reflect the current contents of your collection.
- Edit: Click the edit icon,
 , to edit the report. When you resave a report after editing (even with a different name), the original report setup is overwritten.
 - Duplicate: Click the duplicate icon,
 , to duplicate a saved report. This is a quick way to create one or more additional reports based on the original report's settings.
 - Delete: Click the delete icon,
 , to delete the report. Destiny notifies you if the report is a favorite of any other users. When you delete a saved report, previously run reports are not deleted from the Report Manager.