Generate a Title & Copy List (Library Manager)
The Title & Copy List lets you create collection reports based on title, circulation type (not available for district media centers), copy category, date added/updated, or a Resource List. You can show titles with copies in a specific status, such as available, checked out, lost, on hold, or on order.
The reported information can be as broad or as narrow as you want it to be. It can include just a list of titles, or all the titles and copies you have.
Create a New Report
- Select Reports > Library Reports.
- Under Catalog -- Titles & Copies, click Title & Copy List.
- (Optional) If you log in to the district, select either the district or an individual library from the For drop-down.
Notes:
- Only a district-level user with Manage Library Materials for the District or Create Reports for the District permissions can create a district-level report.
- If you select the district, the report is limited to the first 10,000 qualifying titles and copies.
- Click the Select By drop-down, and select a method for identifying the titles to include in the list.
- If you select Title, enter a range in the from and to fields and next to the Select By drop-down.
Notes: - If you leave both from and to fields blank, the report includes all titles.
- If you leave the from field blank and enter a name in the to field, the report includes all those up to and including the title entered.
- If you enter a name in the from field and leave the to field blank, the report includes that name and all those after it.
- If you enter the same name in both fields, the report is limited to that one name.
- You cannot use wild cards (?, *) in ranges.
- If you are running a report on a specific title in Textbook Manager, make sure to enter the name of the primary textbook, not the supplement.
- If you select Circulation Type or Category, select one or all from the Include list.
- For one Circulation Type, the report includes copy information for only those copies of that Circulation Type.
- For Categories, the report includes copy information for only those copies assigned to those categories.
Note: If you are running the report by category for the district, note that the Include list is limited to district-only categories. For a school report, the list is limited to categories specific to the school.
- For one Circulation Type, the report includes copy information for only those copies of that Circulation Type.
- If you select Date Title Added, Date Title Updated or Date Copies Added, select the date range:
- Select the After the Date, On the Date or Before the date from the drop-down next to your date type selection.
- Enter a date in the next field, or click the calendar icon,
 , to select from the calendar.
- If you select List, select the Library Materials Resource List you want to use for the report.
To review the contents of a list, click View List.
- If you select Title, enter a range in the from and to fields and next to the Select By drop-down.
- To include itemized copy information in the list, select one of the options with copies in the Show Titles drop-down.
Notes: - If you select to include any copies, you can also select to include the category names, circulation statistics, or both, in the itemized copy information.
- A district-level user with Manage Library Materials for the District permissions can include both the district and school categories for each copy.
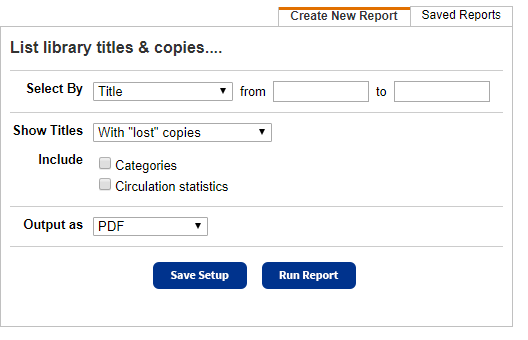
Example: A user selects With "lost" copies in the Show Titles field to see the Include options.
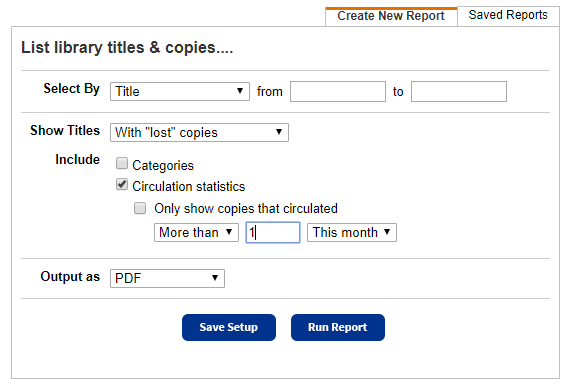
- (Optional) If you included circulation statistics, you can then limit the report to copies that circulated a certain number of times:
- Select the Only show copies that circulated checkbox.
- Select More than, Equal to or Less than from the drop-down.
- Enter the number of circulations required for the copy to appear in the report.
- Select the time period: This month, This [statistical] year or Total (since you installed Destiny).
- Select a report format from the Output as drop-down:
- To generate the report in Adobe® PDF format, select PDF.
- To generate the report in Microsoft® Excel® format, select Microsoft Excel.
- To run the report now, click Run Report.
To save the setup, click Save Setup. A Save Report page appears:- Enter a name that is unique for the report at your library.
- Click either Save, to save the report, or Save and Run, to save the report and run it now.
When saving your Title & Copy List report setup, you may need to pay special attention to some of the settings. These depend on the option you selected in Select By:
- List: When you create and save a report setup based on a Library Materials Resource List:
- While editing the report setup, other users can view your Library Materials Resource Lists.
- If you delete the list, you cannot run the report again until you select another list.
- Date: When you run a saved report with a date limiter, Destiny again displays the saved date and reminds you to change it.
- Circulation Type: If you save a report based on a Circulation Type and then delete the Circulation Type, you cannot run the report again until you select another Circulation Type.
- Category: If you save a report based on a Category and then delete the Category, you cannot run the report again until you select another Category.
Once you save the report setup, it appears on the Saved Reports sub-tab, where you have more options for working with it:
- Add to Favorites: Click the Add to Favorites icon,
 , to add the report to your My Favorites page. Reports already in your My Favorites list are designated with a favorite icon,
  .
. - Run: Click Run to run the report. Each time you run the report, the results reflect the current contents of your collection.
- Edit: Click the edit icon,
 , to edit the report. When you resave a report after editing (even with a different name), the original report setup is overwritten.
 - Duplicate: Click the duplicate icon,
 , to duplicate a saved report. This is a quick way to create one or more additional reports based on the original report's settings.
 - Delete: Click the delete icon,
 , to delete the report. Destiny notifies you if the report is a favorite of any other users. When you delete a saved report, previously run reports are not deleted from the Report Manager.
Additional Details
After setting up your report, you can save it. When you save a report setup, it appears on the Saved Reports tab. From there, you can run it later, edit it, duplicate it or delete it. Each time you run the report, the results reflect the current contents of your collection. The report includes the following:
- Call number of the copy
Note: If a title has copies with different call numbers, the title is listed under each call number.
- Title
- Material type
- Author
- ISBN
- LCCN
- Total number of copies
- Number of copies available
- Number of copies checked out
- Number of copies on hold
- Number of copies loaned out
- Number of copies in processing
- Number of copies in quarantine
- Number of copies on order
- Number of copies out for repairs
- Number of copies in transit
- Number of copies lost
- Number of copies returning
If you select one of the Show Titles options that includes copies, the report includes information on each copy meeting the criteria, grouped by Status:
- Its barcode number
- Its price
- If a copy is checked out, it lists the borrower's name, patron type, barcode number and the due date.
- If the copy is lost, it includes the date it was lost.
- Its categories (if you selected the Include categories checkbox)
- The number of circulations for this month, this [statistical] year, and the total (if you selected the Circulation statistics checkbox)
- Number of titles listed
- Total number of copies
- Total number of copies available
- Total number of copies checked out
- Total number of copies on hold
- Total number of copies loaned out
- Total number of copies in processing
- Total number of copies in quarantine
- Total number of copies on order
- Total number of copies out for repairs
- Total number of copies in transit
- Total number of copies lost
- Total number of copies returning
|
Notes:
|
The Title & Copy List report is sorted based on your Select By selection.
- If you selected Title, Date Title Added, Date Title Updated, Date Copies Added or List, the list is in call number/author/title order. If you selected Circulation Type or Category, the list is first sorted by the circulation type or category, then by call number/author/title.
- If you selected Titles only, titles without any copies (and thus, call numbers) are listed at the top of the report. The titles with copies follow those. If you included copy information, copies are grouped by Status (Available, Checked Out, Loaned Out, On Order, Out for Repairs, Lost and On Hold).
- To see a list of lost books, select by Title and show titles With "lost" copies. Use this report before ordering replacements or before running the Individual or Batch Delete in Catalog > Update Copies.
- To discover your in-demand items, select by Title and show titles With copies on hold.
- To discover copies with mistyped or obsolete call number prefixes, select by Title, and choose With all copies. Update the call number prefixes in Catalog > Update Copies > Global Update sub-tab.
- To identify copies that have a particular circulation type assigned to them, select by Circulation Type. Use this report when removing or changing circulation types or loan periods.
- To view all the titles and copies associated with a specific copy category, select by Category. Use this report to create reading lists based on the categories, which can support curricula and promote neglected areas of your collection.
- To find the copies that are not circulating, select one of the Show Titles options that include copies, select the Circulation statistics and Only show copies that circulated checkboxes, and limit it to Less than 1 time This year.