Add a Scheduled Patron Update
Typically, you schedule a patron import to update your patron records in Destiny.
Follett-hosted/Regional Consortium
For Follett Cloud or regional consortium customers that must use the Secure File Transfer Protocol (SFTP) option, see:
- Upload data directly from Student Information System
- Upload data from local disk to Follett’s SFTP Server
Canada
For Follett Canadian customers that must use the SFTP option, see:
- Upload data directly from Student Information System
- Upload data from local disk to Follett’s SFTP Server
Add Scheduled Patron Update
|
Important: On the Schedule Patron Update page, the |
- Log in as a district user.
- Select Admin > Update Patrons > Schedule sub-tab.
- Click Schedule It.
- Enter a unique name in the Job name field.
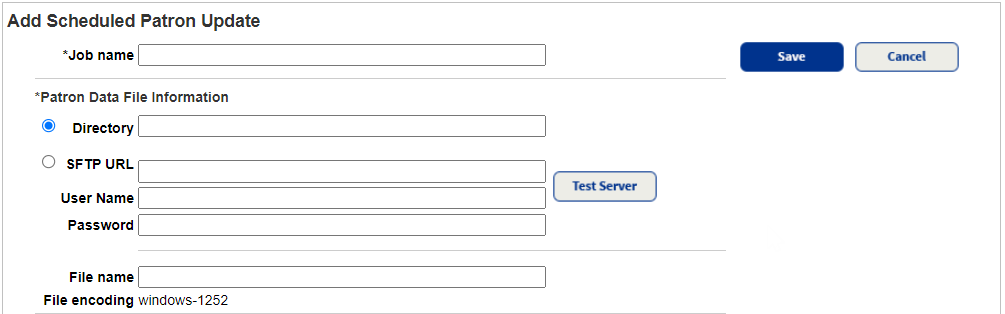
- Select either Directory or SFTP URL. Use the following table to complete the fields:
If you selected... Then... Directory Enter the path to the .csv file on the server. SFTP URL Note: The SFTP fields are case-sensitive. To validate the connection to the server is successful, click Test Server. - Enter the server name and any subfolders where the .csv file exists in the SFTP URL field.
- Enter the user name configured to access the server and folder in the User Name field.
- In the Password field, enter the password for the user name.
- In the File name field, enter the .
csvfile name.Notes: The file must reside on the same server as Destiny.
- Next to Properties file, click Choose File (or Browse, depending on your browser), and navigate to the location of the properties file.
- Use the Job Schedule section to select the type of update to run each day, and enter the Time.
Important:
- To convert and upload all of the records in the
.csvfile that match the properties configuration, select Full. - To convert and upload only records that are newer or have changes since the last update, select Incremental.
If your patron population is under 50,000, Follett recommends selecting Full for each update. If your patron population is over 50,000, select Incremental on weekdays and Full on weekends. - To convert and upload all of the records in the
- Choose any of the Patron Update Job Options:
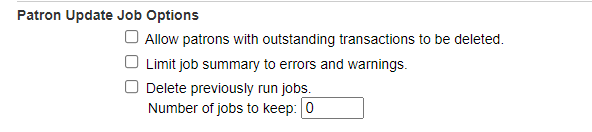
- To delete patron records with transactions, select Allow patrons with outstanding transactions to be deleted.
- To limit the details in the update report to errors and warnings, select Limit the Job Summary details to errors and warnings; otherwise, a record for each patron in the update will be in the report.
- To delete previous jobs, select Delete previously run jobs and optionally, enter the Number of jobs to keep.
- Use the Inactivation / Deletion section to choose which patron records, if any, to delete after a FULL update is completed and the job does not fail (and there are less than 100 skipped records).
Note: Patron Inactivation is for customers uploading a CSV file. Contact Technical Support for help with Patron Inactivation if using SIF or OneRoster.
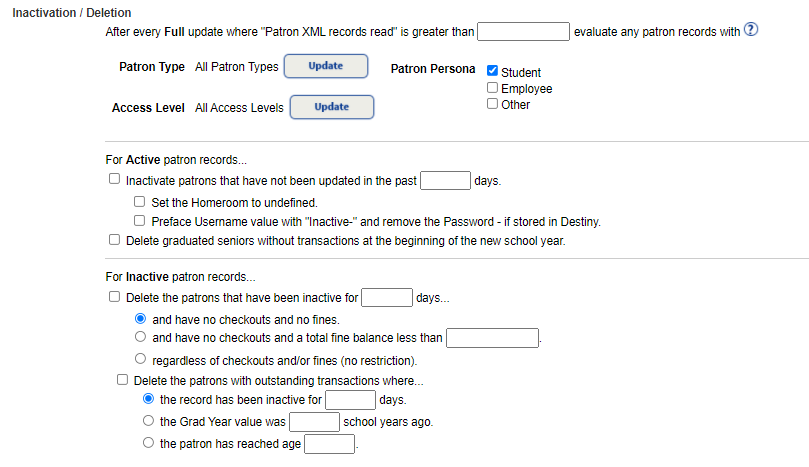
- In the After every Full update where "Patron XML records read" is greater than field, enter a value between 0 and 999,999 as to approximately the number of records that should be included in the Full update.
Note: This setting lets you define the number of XML records that must be read in the patron update for this process to be initiated. If the number of records read equals or is less than the defined value, then patrons will not be inactivated. Follett suggests you review your current full patron uploads to determine the average number of patron records read. Subtract a few percent from the average to use as the defined number for this field. For example, the average number of patron records processed in a full update is 45,000. Subtract 2,000 and set the 'greater than' value at 43,000. This allows for a variance in patron records, yet still ensures the 'inactivate and delete' process will run.
- To limit the patron records based on Patron Type, click Update.
- To limit patron records meeting a specific Access Level, click Update.
- To limit records to a Patron Persona, select the appropriate checkbox.
Note: If you have multiple patron uploads, set the relative Patron Type, Access Level, and Patron Persona for each job. - Use the following table to complete the remaining fields:
If the patron records are... Then... Active - To make active patron records inactive that have not been updated in a predetermined amount of time, select Inactivate patrons that have not been updated in the past, and enter the number or days in the field.
- To remove data from the patron record's homeroom field, select Set the Homeroom to undefined.
- To change the username to inactive and remove the password, select Preface Username value with "Inactive-" and remove the Password - if stored in Destiny.
- To delete patron records of seniors that have graduated, select Delete graduated seniors without transactions at the beginning of the new school year.
Note: This option can be used to automatically delete the prior years’ seniors. Districts need to ensure patron data for the newest year is uploaded prior to the first of the month that the statistical year starts. Otherwise, any senior that did not graduate and should have a new graduation year could be deleted if not updated in time.
For example, today's date is October 15th, 2021, the patron record for John Smith shows grade 12, and the graduation year listed is 2020. The district setting in Destiny for Statistical Year Starts In is set to August, which is the 2021 school year. John's patron record would be deleted from Destiny.
Inactive - To delete patron records with or without associated fines and that have been inactive in Destiny for a set number of days, select Delete the patrons that have been inactive. Enter the number of days in the field, and choose one of the following options:
- and have no checkout and no fines.
- and have no checkouts and a total fine balance of less than, and enter the dollar amount.
- regardless of checkouts and/or fines (no restrictions).
Note: If you choose this option, you are no longer able to delete patron records with outstanding transactions.
- To delete patron records that have outstanding transactions, select Delete the patrons with outstanding transactions where, and choose one of the following options:
- the record has been inactive for, and enter the number of days in the field.
- the Grad Year value was, and enter the number of years in the field.
- the patron has reached age, and enter the age in the field.
Note: Enter a value between 0 and 99 in the chosen option's field.
- To make active patron records inactive that have not been updated in a predetermined amount of time, select Inactivate patrons that have not been updated in the past, and enter the number or days in the field.
- In the After every Full update where "Patron XML records read" is greater than field, enter a value between 0 and 999,999 as to approximately the number of records that should be included in the Full update.
- When you are finished, click Save. The Update Patrons page appears.
- Find your job, and then click Run. The Job Manager page appears.
- Review the Job Summary, and proceed accordingly.
To work with messages in the Job Summary:
Common Exceptions in the Update Patrons Job Summary
Resolving Barcode Conflicts in the Update Patrons Job Summary