Add, Edit, or Delete Copy Categories
You can add, edit, or delete Copy Categories.
|
Note: Copy Categories created at the district level are only visible at the district; those created at the site level only appear at the site they were created in. |
To add a Copy Category:
- Select Catalog > Library Search > Copy Categories sub-tab.
Note: If you are a Textbook Manager or Media Manager user, select the Textbook Search or Media Search sub-tab.
- Next to Add Copy Category, type a unique name of up to 30 characters.

- If you want patrons to see the Copy Category when searching, deselect the Restricted checkbox.
- Click Save.
- Assign copies to the Copy Category.
|
Notes:
|
To edit the name of a Copy Category or its availability to patrons in a search:
- Select Catalog > Library Search > Copy Categories sub-tab.
Note: If you are a Textbook Manager or Media Manager user, select Textbook Search or Media Search.
- Next to the Copy Category you want to edit, click
 .
. - Do either or both of the following:
- Next to Edit Copy Category at the top of the page, edit the name (must be a unique name with a maximum of 30 characters).
- Select or deselect the Restricted checkbox, depending on whether you want it visible to patrons during searches.
- Click Save.

To delete a Copy Category:
|
Note: When you delete a Copy Category, it is removed from all associated copies. |
- Select Catalog > Library Search > Copy Categories sub-tab.
Note: If you are a Textbook Manager or Media Manager user, select Textbook Search or Media Search.
- Next to the Copy Category you want to delete, click
 . A pop-up indicates how many copies are assigned that Copy Category.
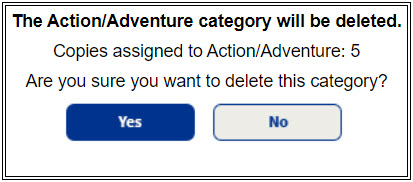
- To proceed, click Yes.